
Introduction
People organize their inboxes in a variety of ways. One method is to transfer emails to special folders, known as Labels in Gmail. So, in this section, we’ll teach you how to label and transfer emails automatically.
Labeling is particularly critical if you get a large number of communications on a regular basis. Those branded emails are visible in your inbox at a glance. However, since they are moved to the relevant “folder,” you may also see them there. All of this is possible simply establishing a filter in Gmail.
Label and Move Emails in Gmail Using a Filter
You may use a Gmail filter to set up the criteria for incoming emails and then add a label to the messages that fit. Then, choose the label’s folder to view all emails tagged with that label.
- Please keep in mind that this approach does not erase the emails from your inbox.
Visit Gmail and, if required, sign in. To access the Settings, click the gear symbol in the upper right corner. Then, in the sidebar that displays, pick “See All Settings.”

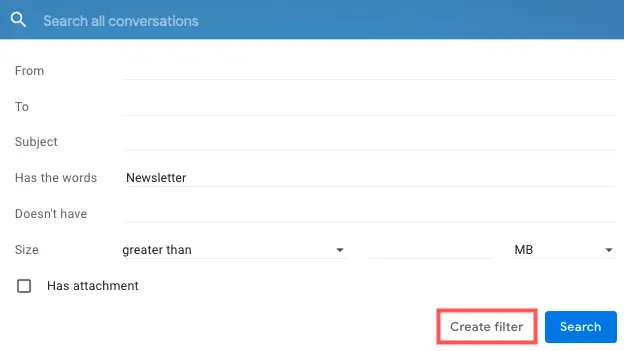
Select “Create a New Filter” from the “Filters and Blocked Addresses” tab under Settings.

Set the criteria for the emails you wish to categorize in the box that displays. In the fields such as From, Subject, Has the Words, and Size, you may insert one or more criteria. Click the “Create Filter” button.
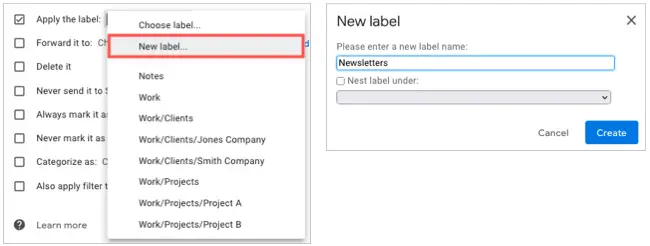
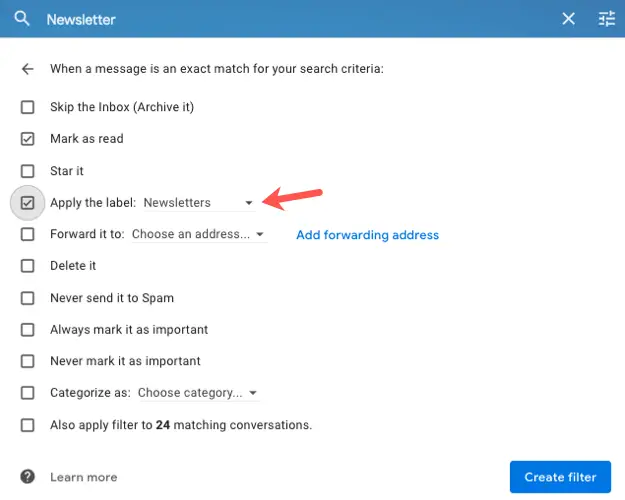
The action to label the emails will be created next. Check the Apply the Label box and choose the label from the drop-down box.
If you wish to create a new label, choose “New Label,” give it a name, and nest it inside an existing label if desired. At the same time, this generates a folder for the label.
Other actions, such as Mark as Read or Star It, are available if desired. You may also tick the box at the bottom to apply the filter to matching conversations as well. This applies the filter to any emails that are already in your inbox. Click the “Create Filter” button.
Once the filter is set up, all future emails that meet the criteria will be labeled. This is visible not just in your email, but also in the label’s folder.
Display the sidebar on the left and, if required, expand Mail. Then, choose the label’s folder, and you’ll see that all emails have been transferred to this location as well, providing you with fast and simple access to them.

If you need to update a filter you created, go to Settings > Filters & Blocked Addresses, click “Edit,” and make your adjustments.
Manually Move or Label Messages in Gmail
You may also manually transfer a message to the folder associated with a label. This is useful if you didn’t apply the filter to your inbox when you set it up.
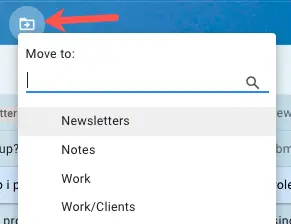
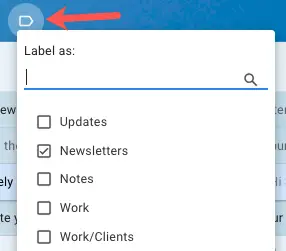
Choose one email from your inbox and then click the Move To symbol at the top. Select the label’s folder, and the message will be moved there.
This will merely relocate the label rather than apply it to the email. If you want to apply the label to the email as well, select it, click the Labels icon in the toolbar, and check the box next to the label you want.
Keeping your inbox organized is critical to preventing crucial messages from being lost in the shuffle. So, if you believe this strategy will work for you, give it a go!