
Introduction
Windows includes built-in capabilities for safely wiping a drive’s data by writing zeros to it. This prevents deleted files from being retrieved from the disk. Here’s how to erase an internal disk or an external USB device.
What You Should Know
Often, erased files may be recovered from a disk. Whether or not this is feasible is contingent upon a variety of things.
If the drive is a conventional magnetic disk drive with a spinning platter, lost files are simply “marked” as deleted and will be overwritten in the future, making data recovery simple. This should not be the case with contemporary solid-state drives, which should default to using TRIM, which ensures that deleted data are erased instantly. (This expedites the process.)
However, the choice is not as straightforward as mechanical vs. solid-state storage: External storage devices like as USB flash drives do not use TRIM, which implies that erased files on a USB flash drive can be retrieved.
To avoid this, you can “wipe” a drive. This is a really straightforward procedure: Windows will write zeroes or other garbage data to every sector of the disk, obliterating any existing data. This is especially critical if you’re selling or otherwise disposing of a computer, disc, or USB stick that contained sensitive personal data.
By the way, encrypting a disk adds a layer of protection. If an attacker is unable to obtain your encryption key, they will be unable to retrieve erased files from a drive—in fact, they will be unable to access files that have not yet been destroyed.
Option 1: Delete All Files From Any Drive
To write zeros over the contents of any disk, simply do a full format. Prior to performing this operation, keep in mind that it will entirely delete all files on the device. Additionally, you cannot execute a complete format of your Windows system disk while Windows is running on it.
This approach is optimal for internal disks that do not include your operating system, USB flash drives, and other external storage devices, as well as any full partitions you wish to delete.
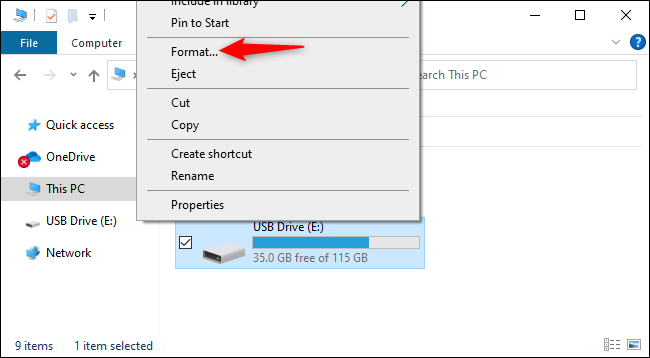
To begin, use File Explorer and navigate to the disk you wish to erase. Select “Format” from the context menu.
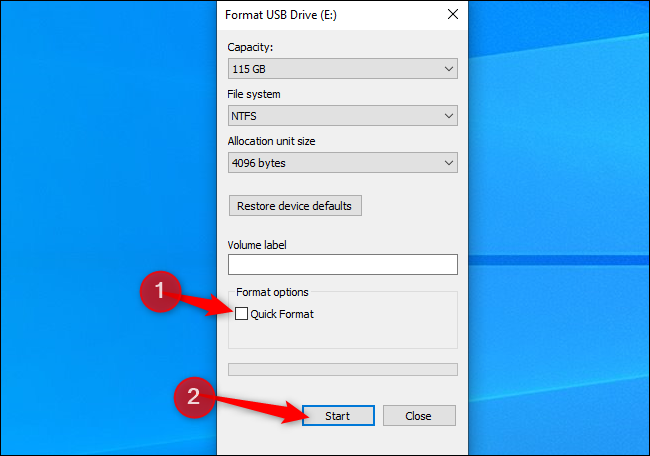
Under Format Options, uncheck “Quick Format.” This will guarantee that Windows 10 or Windows 11 does a full format rather than a partial format. According to Microsoft’s literature, Windows has always written zeros to the whole drive when doing a complete format since Windows Vista.
You can modify any additional formatting settings here; simply uncheck “Quick Format.” (If you’re unsure, simply leave the choices here at their default values.)
When you are ready, click “Start” to begin the formatting process. The procedure may take a while, depending on the disk’s size and speed.
- Warning: The format operation will completely wipe out the contents of the drive. Before proceeding, ensure that you have a backup of any critical files.
Option 2: Delete All But Free Space
If you’ve erased files from a mechanical hard drive or an external storage device, you may choose to wipe only the available space, overwriting it with zeros. This will ensure that erased files cannot be retrieved without completely erasing the disk.
Windows 10 and Windows 11 both provide a means to accomplish this, but it requires a trip to the command line. The cypher command included with Windows includes an option that wipes the free space on a disk, overwriting it with data. The command will really do three passes, the first with zeros, the second with another type of data, and finally with random data. (However, one pass should enough.)
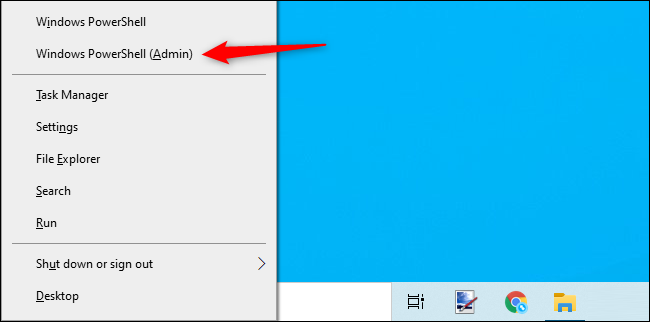
To begin, open a command-line environment with administrator rights, such as the Command Prompt or Windows Terminal. On either Windows 10 or Windows 11, right-click the Start button or press Windows+X and select one of the following options: “Windows PowerShell (Admin)”, “Command Prompt (Admin)”, or “Windows Terminal (Admin)”. Select whatever appears in the menu—any will suffice.
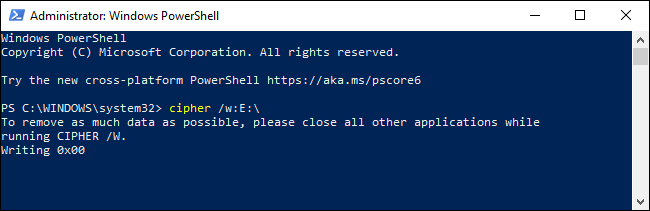
Execute the following command, substituting X for the drive letter of the drive for which you wish to erase free space:
- cipher /w:X:\
For instance, if you wish to delete all empty space on your D: disk, you would use the following command:
- cipher /w:D:\
The command’s progress will be shown on the command line. Wait for it to complete—this may take some time, depending on the speed of your disk and the quantity of empty space to be overwritten.
Option 3: Delete All Files From Your Windows System Drive
There is a simple technique to erase your complete Windows operating system disk. On Windows 10 and Windows 11, this option is built into the Reset This PC function, however it is not activated by default.
While Windows is restoring its factory default settings—that is, reinstalling Windows—you can instruct it to wipe your system disk. You should utilize this option to safeguard your private information if you’re selling or donating your computer to someone else.
To begin, navigate to Settings > Update & Security > Recovery in Windows 10. Under Reset This PC, click “Get Started.” (You may easily enter the Settings app by pressing Windows+i.)

Navigate to Settings > System > Recovery on Windows 11. Under Recovery Options, click the “Reset PC” option.
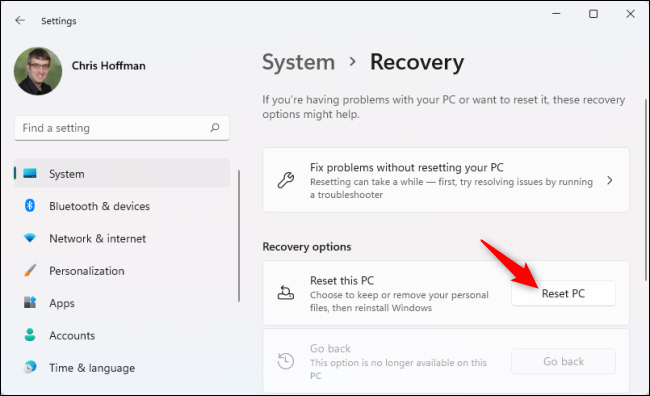
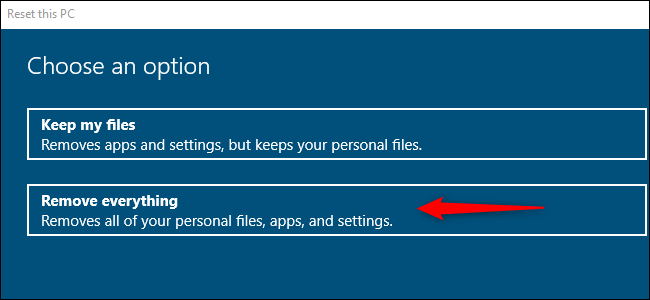
Select “Remove Everything” to have Windows automatically delete all of your data throughout the Reset procedure.
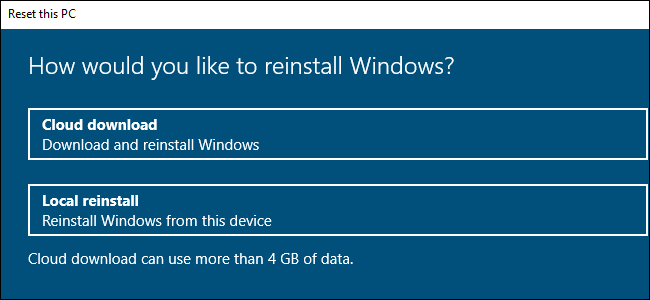
Choose either “Local Reinstall” or “Cloud Download” for this operation. If you’re unsure which option to choose, we recommend “Local Reinstall” to avoid the lengthy download.
“Cloud Download” is beneficial if the files in your local Windows operating system are corrupted and the Reset This PC method fails to operate. Additionally, believe it or not, Cloud Download can be faster than Local Reinstall since Windows just downloads the installation files rather than reconstructing them from the data on your computer’s hard drive—this is dependent on the speed of your internet connection.
Select “Change Settings” from the Additional Settings menu.
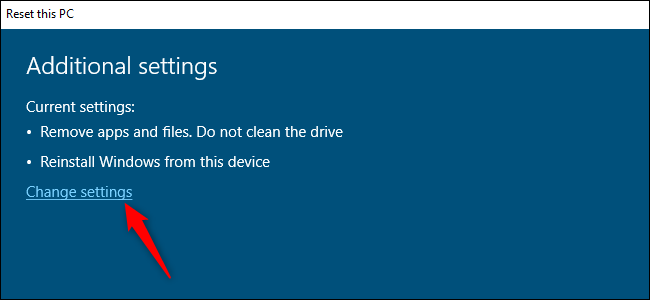
To ensure that the switch under “Clean data?” is set to “Yes,” clean it. With this option set, Windows will “clean the disk” and make recovering your files much more difficult (theoretically, practically impossible).
Windows informs you that this operation may take many hours—as is always the case, this is dependent on the speed and capacity of your computer’s hard disk.
You may now click “Confirm” and proceed with the process of resetting your Windows 10 or Windows 11 PC and wiping its hard disk.
- Warning: This method will delete all data, apps, and settings on your disk, leaving you with a completely blank Windows installation. Make a backup of anything vital first.
By the way, Windows refers to this operation as “cleaning the disk” rather than “erasing the drive.” This is in contrast to the typical Windows definition of “cleaning” a drive, which refers to deleting all of its partition information rather than erasing it.