
Introduction
Setting a different wallpaper on each of your numerous displays was an easy technique in Windows 8, and the choice remained hidden for a time in Windows 10. Fortunately, it has been reinstated in a more sensible position.
The Simple Way: Use the Settings App to Set a Wallpaper
Microsoft has released a better solution to Windows 10 after we initially published this post. Here you go:
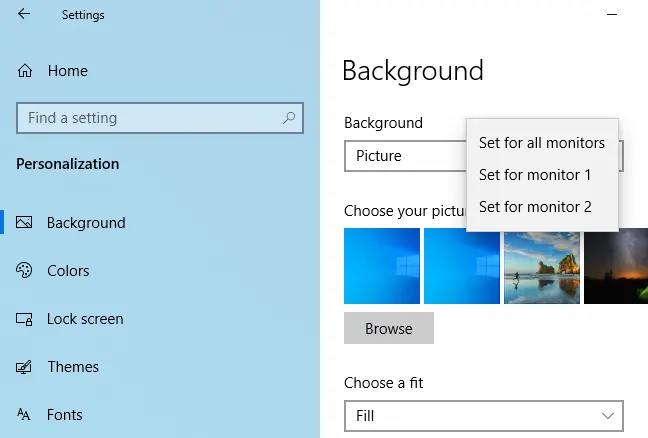
To change the desktop wallpaper for each monitor separately, go to Settings > Personalization > Background. Right-click a backdrop picture in Choose Your Picture and choose “Set For Monitor 1,” “Set For Monitor 2,” or any other monitor you wish to use it on.
To add more photos to this list, click “Browse” and choose a wallpaper to use. On all desktops, Windows will make it your default. Right-click the wallpaper icons and choose which monitor each should be shown on.
When Should You Use This Method? (and When to Use Third Party Tools)
Update: Since Windows 10 has included a simple, efficient way to change your desktop wallpaper, as we explained above, using any of the following techniques to change your desktop wallpaper is no longer essential. You may still utilize the “Imperfect Method” if you like.
First and foremost, we want to make the greatest use of your time – both when reading this article and afterwards while you’re mixing up your wallpapers. With that in mind, examine the two situations below.
Scenario one: You don’t change your desktop wallpaper very often, but you’d want to have a distinct backdrop on each monitor. In this case, the method in this article (which is rapid and leverages a built-in option in Windows) is ideal since it takes less system resources.
Scenario two: if you want to utilize several and varied backgrounds on each of your displays, and you want a lot of control over it, Windows 10’s basic wallpaper settings are probably not going to cut it. If you’re a wallpaper junkie or need fine-grained control over your backgrounds, we recommend the venerable (and still very useful) John’s Background Switcher (free) or the Swiss Army Knife of multimonitor management, DisplayFusion (the features relevant to wallpaper management are available in the free version).
However, if you find yourself in Scenario 1, let’s look at how to install a custom wallpaper on each monitor in Windows 10. (If you’re in the mood to tweak everything, also see how to customize your Windows 10 login and lock screen.)
How to Choose Different Wallpapers for Different Monitors in Windows 10
In Windows 10, there are two methods to pick multiple monitor backgrounds, neither of which is especially simple. We’ll show each way using a selection of Game of Thrones wallpapers. For comparison, here’s our current desktop, with the default Windows 10 wallpaper duplicated on each of our three monitors.

It’s excellent wallpaper in terms of standard wallpaper, but it’s a little monotonous. Let’s shake things up.
The Simple but Inadequate Method: Change Your Wallpaper Using Windows File Explorer
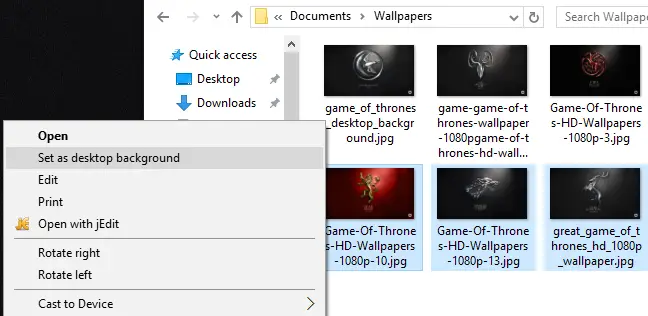
The first technique is less straightforward since it requires you to choose the photos in Windows’ File Explorer and understand how Windows will handle multiple image selections. In the File Explorer, choose your photographs by holding down the Ctrl or Shift key. While the photos you want to utilize are still chosen, right-click on the image you want to assign to your main display.
Note: This is the main monitor as determined by Windows through the Settings > System > Display menu in the Control Panel, not necessarily the major/important display you consider.
Select “Set as desktop wallpaper” from the right-click context menu.
These photos will be set as your desktop backgrounds by Windows. The picture we clicked on (the crimson wallpaper with the House Lannister crest) is shown below on the middle monitor. The other two wallpapers, for House Stark and House Baratheon, are set on the secondary and tertiary monitors at random.

This is an especially clumsy option since you have no control over where the pictures on the secondary displays will be shown. It also has two more annoying flaws: it will not operate if the pictures are not the precise resolution of your display, and it will randomly rotate places every 30 minutes.
With those flaws in mind, please understand that we have showed you this way only for the sake of completeness and instruction, not because we believe you would prefer it. Let’s have a look at a far superior approach.
The Difficult but Effective Method: Change Your Wallpaper Using the Personalization Menu
Update: The command no longer displays the old Control Panel interface, but you may perform the same thing by going to Settings > Personalization > Background.
When Windows 8 was released, one of the first things multi-monitor users noticed was a slew of new menu choices, including a very simple multi-monitor wallpaper selection tool embedded directly into the Control Panel’s Personalizations menu. That option mysteriously disappeared in Windows 10.
It’s no longer available under Settings > Personalization > Backgrounds, where you could choose a single picture as your backdrop regardless of how many displays you have. Furthermore, it is no longer available under Control Panel > Appearance and Personalization > Personalization, where there was a direct connection to it in Windows 8. Surprisingly, even though no menus directly connect to it any more, the menu itself is still there waiting for you.
To get there, hit Windows+R on your keyboard to open the Run dialog box, then type the following text:
control /name Microsoft.Personalization /page pageWallpaper
Enter, and you’ll see the classic wallpaper selection menu thanks to the power of command-line wizardry.
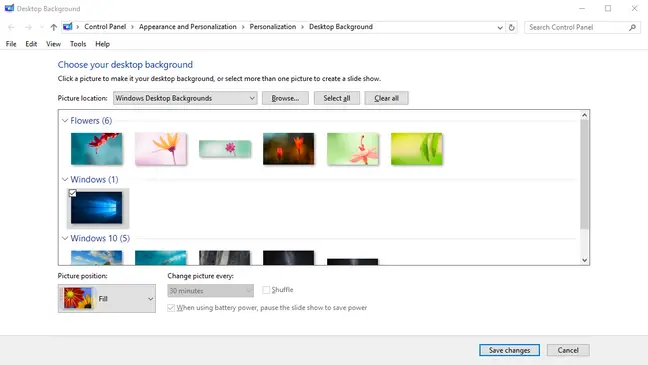
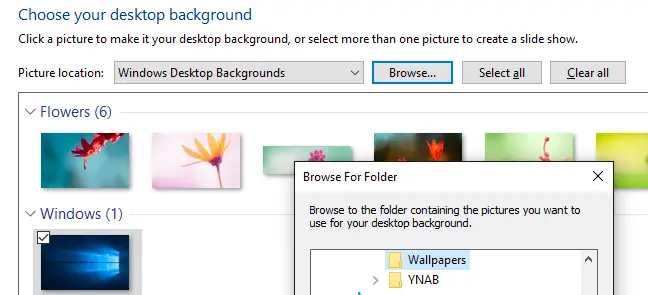
We may go to the folder containing our Game of Thrones wallpapers by clicking the “Browse” option (or we can use the dropdown menu to navigate to existing wallpaper locations like the Windows Pictures library).
Once you’ve loaded the directory you want to work with, you’ll finally be able to acquire the per-monitor control you’ve been seeking for. Deselect the pictures (Windows checks them all when you open the directory) and then select a single image. Right-click on it and choose the monitor to which you want to attach it (again, go to Settings > System > Display if you’re not sure which monitor is which number).

Repeat the procedure for whatever wallpaper you want to use on each display. What was the ultimate result? On each display, we want the following wallpaper:

If you want to spice things up even more, you may pick numerous photographs and then use the “Picture position” drop-down menu to modify how the image is shown and the “Control picture every” option to change how often the selection of photos you have is updated.

