
Introduction
Although Windows 11 has stringent system requirements, there are workarounds. It needs an 8th-generation Intel, AMD Zen 2, or Qualcomm 7 or 8 Series CPU, for example, however Windows 11 may be installed on PCs with earlier CPUs.
Should You Upgrade a PC That Isn’t Supported
First and foremost, if you’re on the fence about updating an unsupported PC to Windows 11, we strongly advise against it. Security patches for Windows 10 will be available until October 2025.
Windows 11 doesn’t have any major new features that make it a must-install, and Microsoft cautions that unsupported PCs may have flaws. In fact, Microsoft cautions that it may discontinue releasing security updates for unsupported Windows 11 PCs in the future.
However, if you want to run Windows 11 on unsupported hardware, we can assist you.
Whatever you do, make a backup of your critical data first. It’s usually a good idea to have a backup, particularly if you’re updating to a new operating system that isn’t officially supported on your hardware.
- Tip: In certain cases, a setup modification or two may make your PC officially supported.
How to Figure Out Why Your Computer Isn’t Supported
By downloading and running Microsoft’s PC Health Check program, you can see whether Windows 11 is compatible with your PC.
Upgrading to Windows 11 is simple if your PC is supported. It takes just a few clicks to complete.
If your PC isn’t officially supported by Windows 11, the PC Health Check will inform you why it “doesn’t presently satisfy Windows 11 system requirements.” If the test indicates that your PC is unsupported, the procedure you must take will be determined by the fault it identifies. To make your PC supported, you may just need to alter a setting in the UEFI firmware (the new successor for the BIOS)—or the procedure may be more extensive.

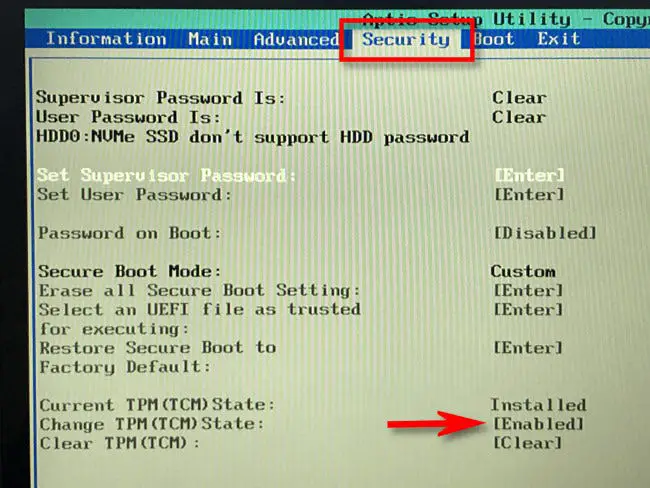
How to Activate TPM 2.0
TPM 2.0 is required for Windows 11. (However, if your PC only supports TPM 1.2, there is a simple method to install Windows 11, which we’ll detail below.)
If the program says your machine doesn’t have TPM, it’s possible that it has, but that it’s off by default.
You’ll need to go into your computer’s UEFI firmware settings to check for and activate TPM 2.0. (the modern replacement for the BIOS). Look for “TPM,” “Intel PTT,” “AMD PSP fTPM,” or “Security Device” among the options. It might be in the main UEFI settings menu or a submenu like “Advanced,” “Trusted Computing,” or “Security.”
For further information, look for your computer’s model name and “enable TPM” in an internet search engine, or go through its official documentation. (If you build your own PC, look up the model name of your motherboard.)
You may also need to upgrade the UEFI firmware on your computer or motherboard. Updates have started flowing out that either activate TPM 2.0 by default or add support for it. On certain PCs, a firmware upgrade from TPM 1.2 to TPM 2.0 may be available; this depends on your hardware and system manufacturer. For further information about Windows 11 upgrades, contact the maker of your computer (or motherboard).
Restart the PC Health Check tool after activating TPM. If that was the only issue, you should be able to update properly.
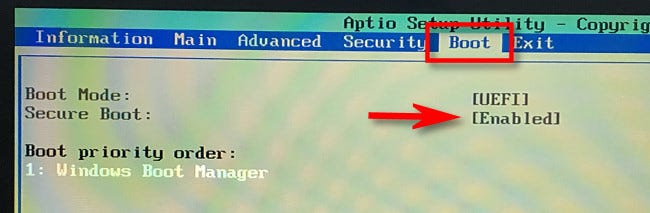
How to Make Secure Boot Work
If PC Health Check shows that your machine isn’t utilizing Secure Boot, check for a “Secure Boot” option in the UEFI firmware settings and activate it if feasible.
Secure Boot may have been deactivated during the installation of Linux, or it may have been disabled by default on your motherboard. Modern Linux distributions such as Ubuntu and Fedora run on PCs that have Secure Boot enabled, so you don’t have to deactivate it to install Linux.
Re-run the PC Health Check utility if you were able to activate Secure Boot. If Secure Boot was the only issue, you may now update regularly.
How to Resolve UEFI Errors (MBR Instead of GPT)
UEFI is required for Windows 11. Both UEFI firmware and a classic legacy BIOS are available on certain older PCs. If your PC has UEFI as an option but you’re presently using a “conventional” MBR partitioning arrangement, you’ll need to migrate to a GPT partition table to utilize UEFI.
This may be accomplished in a variety of ways. You may be able to convert a disk from MBR to GPT using Microsoft’s MBR2GPT utility. You should only do this if you know your PC supports UEFI, and you may need to adjust settings in your PC’s firmware to make it boot in UEFI mode rather than old BIOS mode later, according to Microsoft.
If this is your only issue, a clean install might be a better option. First and foremost, make a backup of your stuff (we recommend backing up your files before upgrading anyway.) Then, on a USB drive or DVD, use Microsoft’s Media Creation Tool to produce bootable Windows 11 installation media. Now, use the installation DVD to wipe your hard drive and do a clean installation of Windows 11—you may need to first set your computer’s firmware into UEFI mode. Your Windows 10 system will be erased, and your disk will be formatted in GPT mode.
Only TPM 1.2 and/or Registry Hack for Unsupported CPUs
This is the simplest problem to solve if your sole issue is that your computer has an unsupported CPU and/or only has TPM 1.2 instead of TPM 2.0.
You can get past this limitation with a simple Windows Registry edit if you want to. When you make this modification, Windows 11 will disregard the CPU version check and install even if only TPM 1.2 is installed. However, this won’t remove other checks—for example, if your machine doesn’t have a TPM, you won’t be able to update with this registry modification.
- Warning: The Windows Registry is complicated, and everything you add, alter, or remove in it should be done with caution. You run the risk of causing issues with your Windows installation. If you don’t know how to alter the registry, you should probably avoid updating. However, as long as you follow our recommendations, you should be OK.
Open the Registry Editor to get started. You may enter “regedit” into the Start menu’s search box and hit Enter, or type “registry” into the search box and choose the “Registry Editor” shortcut.

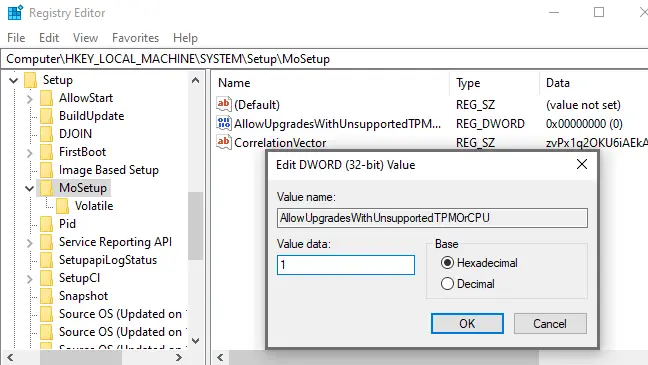
In the Registry Editor window, type the following address into the address bar (or go to it in the left pane):
- HKEY_LOCAL_MACHINESYSTEMSetupMoSetup
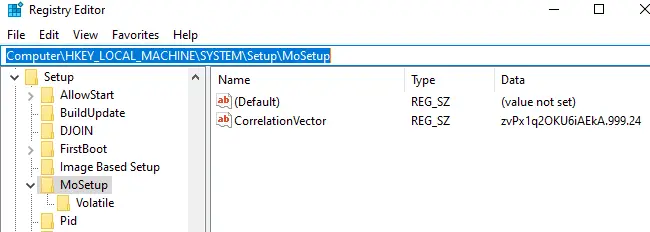
Select New > DWORD (32-bit) Value from the right-click menu in the right pane, and type the following text as the name:
- AllowUpgradesWithUnsupportedTPMOrCPU
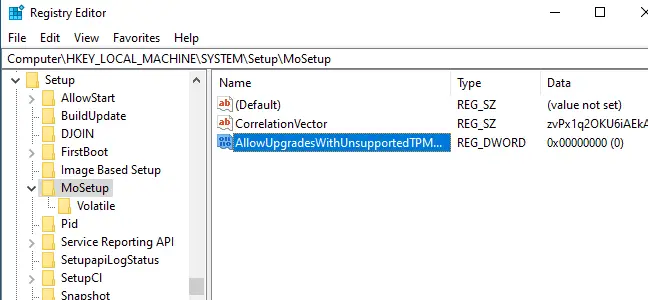
Click “OK” after double-clicking the “AllowUpgradesWithUnsupportedTPMOrCPU” value and setting it to “1.”
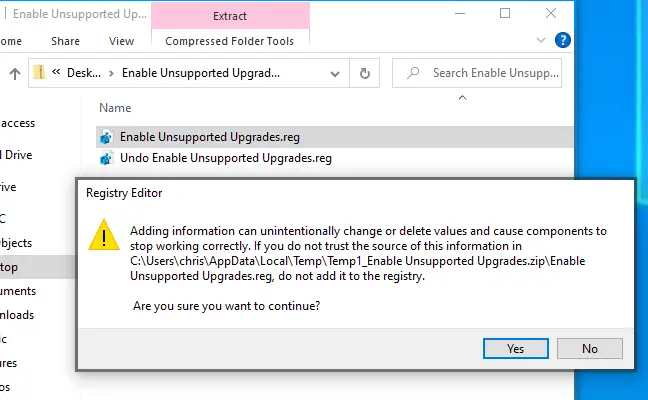
Do you want to avoid having to modify the registry? To make the change in only a few clicks, download our Enable Unsupported Upgrades registry hack.
This ZIP file includes two REG files: one that allows upgrades on unsupported PCs (Enable Unsupported Upgrades.reg) and one that reverses the change (Revert Unsupported Upgrades.reg) (Undo Enable Unsupported Upgrades.reg). Simply double-click the “Enable Unsupported Upgrades.reg” file and confirm that you want the information to be added to your registry. Double-click the Undo file if you wish to undo your edit.
These files do the same thing as the registry hack above, but they change the “AllowUpgradesWithUnsupportedTPMOrCPU” value to “1” (to allow unsupported upgrades) or “0” (to prevent them) (to revert to the default setting).
Before proceeding, reboot your computer to verify the modification takes effect.
You may now update your PC to Windows 11 by downloading and running the Windows Installation Assistant application from Microsoft’s website, just as if it had a compatible CPU or TPM 2.0. All you have to do now is consent to a warning.
- Keep in mind that this only accomplishes two goals: It allows Windows 11 to skip the CPU requirement and install using TPM 1.2 rather than TPM 2.0. Other conditions will not be met. This registry adjustment won’t assist if your PC doesn’t have a TPM or simply has a classic BIOS rather than UEFI firmware.
PCs with no TPM, no UEFI, or other serious issues
Things start to get hazardous now if the recommendations above and the registry hack aren’t adequate for your PC. If your computer, for example, does not have a TPM, it is completely unsupported.
What exactly does it imply? Microsoft, for example, offers an approved means to install Windows 11 on older CPUs and TPM 1.2 chips. All you have to do is change a registry setting. It’s not officially supported, but Microsoft will assist you.
Even if you don’t have TPM 1.2 or UEFI, there are apparently methods to install Windows 11. But this is completely unsupported—if you hack your way past even these basic requirements, you’re considerably more likely to discover issues and miss out on future security upgrades. People who have tried these methods have reported varying degrees of success. Even if it works for you now, an update in a few months might cause your computer to blue-screen, causing your operating system to malfunction and requiring you to reinstall Windows 10.
We don’t advocate doing any of these risky stunts—you’ll be setting yourself up for failure. Windows 10 will work OK until October 2025, at which point you’ll probably need a new PC if your existing one isn’t up to TPM 1.2.
