
Introduction
The new Photos app is the default picture viewer in Windows 10, but many users still prefer the old Windows Photo Viewer. However, Photo Viewer may be reinstalled in Windows 10. It’s just concealed.
Windows Photo Viewer will be accessible if you update a PC running Windows 7 or 8.1 to Windows 10, and you may set it as your default photo viewer if you choose. However, if you make a clean installation of Windows 10 or purchase a PC with Windows 10 already installed, you will be unable to use Photo Viewer at all. The Photo Viewer application is still available. It’s only concealed, and you’ll need to make a handful of Registry changes to see it. Following that, you may make it your default picture viewer.
Update: Windows Picture Viewer was not removed from Windows 11, and you may use it as your default photo viewer in Windows 11.
The Issue
Microsoft chose not to include the Registry entries that permit access to Windows Photo Viewer in Windows 10 for whatever reason. Those keys are retained if you upgrade from a previous version of Windows, but they are not produced during Windows 10 installation. Instead, Microsoft wants you to open all of those picture files in its new Photos app.
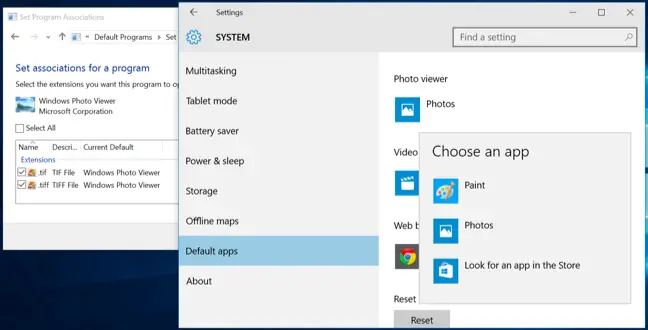
When you go to the Default programs window in Settings, Photo Viewer isn’t even a choice. The previous “Default Programs” Control Panel app is also ineffective. When you open it, you can only make Photo Viewer the default association for.tif and.tiff files, not other image kinds.
You also can’t correlate picture files with Photo Viewer by simply pointing them to a specific.exe file. Photo Viewer is really part of a DLL file called “PhotoViewer.dll” and does not have its own executable file.
So, how can you get Photo Viewer back? Of course, we’ll use our old acquaintance Registry Editor. After that, you may make it your default picture app.
Step One: Enable Photo Viewer in the Registry.
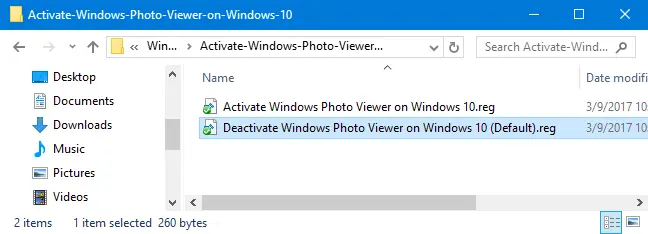
We’ll need to add the identical registry entries that were present on Windows 7 and 8.1 and are still present on computers that upgraded from those older versions of Windows. To make things easier, we’ve created a Registry hack that you can use to make these adjustments fast since they’re a bit time-consuming to perform manually. Download and unzip the following file:
Activate-Windows-Photo-Viewer-on-Windows-10
There are two hacks within. Run the “Activate Windows Photo Viewer on Windows 10″ hack to add the registry keys and values and activate Photo Viewer. To disable it, just execute the “Deactivate Windows Photo Viewer on Windows 10 (Default)” hack. Of course, there is no need to disable it in the Registry. You may always leave it running and just link your picture files with another software.
Note: Many thanks to nexus from TenForums for identifying the necessary registry settings.
Remember, this step is only required if you’re using a new Windows 10 installation. If you updated from Windows 7 or 8.1, you should be able to set Windows Photo Viewer as your default image-viewing program in all of the normal methods.
Step Two: Make Windows Photo Viewer your default image viewer.
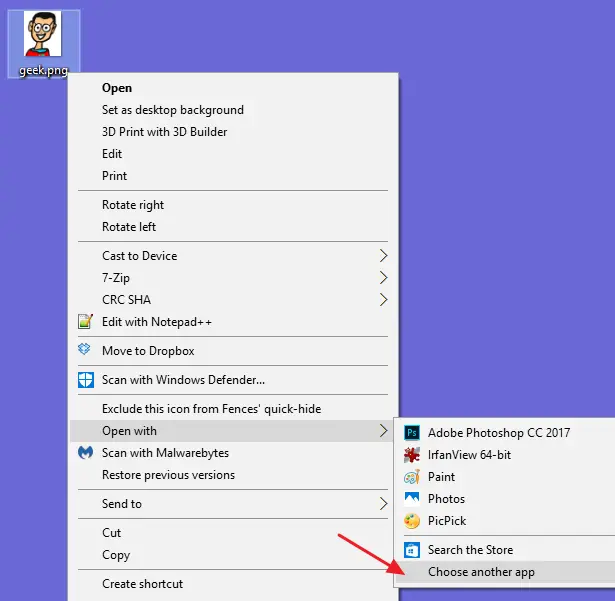
To connect an image file with Photo Viewer, right-click any image file — for example, a.png,.jpg,.gif, or.bmp file — and choose Open With > Choose Another App.
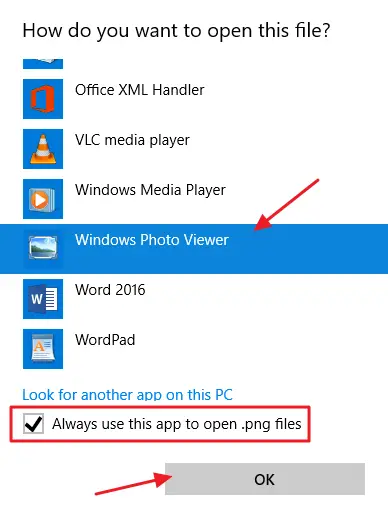
Select Windows Photo Viewer in the “How do you wish to open this file?” dialog. If you don’t see it at first, scroll to the bottom of the list and choose “More applications” – it will appear. Choose “Always use this app to open.___ files” and then click “OK.”
Update: If the “Choose Another App” option doesn’t work for you, here’s another choice: To begin, right-click an image file (for example, a PNG, JPEG, GIF, or BMP file) and choose “Properties” to open the Properties box. Click the “Change” button to the right of “Opens With” in the General pane and pick Windows Photo Viewer.
The default image reader for that sort of picture file is now Windows Photo Viewer. This method must be repeated for each kind of picture file you want to utilize it with. To put it another way, everytime you open a picture in the Photos app, just dismiss it and utilize the “Open with” choice to connect that file type with Windows Photo Viewer. You’ll only need to do this the first time you open a new picture file type.