
Introduction
By default, Windows 10 transmits anything you search for in the Start Menu to their servers to provide you with Bing search results — so be sure you don’t put anything private into your own PC’s Start Menu. Alternatively, you may just deactivate the Bing integration in the Start Menu.
Update, 8/15/22: We now have a solution that works with both the May 2020 Update for Windows 10 and Windows 11. This also prevents the Microsoft Edge advertising that display when you search for Chrome on Windows 10’s Start menu, in our experience.
If you use this approach on Windows 11, the Registry Key location provided in the post will most likely not exist, thus you will have to create it manually. You may also use the REG file we supplied. Everything you need will be generated automatically.
It’s worth mentioning that Android’s default search, as well as iOS on the iPhone, will send your search queries to Google or Apple’s servers to try to obtain more relevant results — but it appears different when you’re on your own computer at home, searching through your personal files.
We’re delighted Microsoft offered an easy option to stop the web integration, but it’s worth mentioning that if you want to use Cortana, you don’t have any control over whether the Start Menu utilizes Bing, so you’ll have to disable Cortana to disable the web integration.
How to Disable Bing in Windows 10’s May 2020 Update’s Start Menu
This feature is controlled by a new registry setting that was introduced with Windows 10’s May 2020 Update. To block web searches in the Start menu, you must update the Windows registry.
Warning: The Registry Editor is a powerful tool, and making the incorrect modification might cause your system to become unstable, if not completely unworkable. This is a simple tweak, and as long as you follow the directions, you should be OK. However, if you’ve never used it before, you should learn about how to use the Registry Editor. Before making any changes, we always suggest backing up your Registry (and your computer).
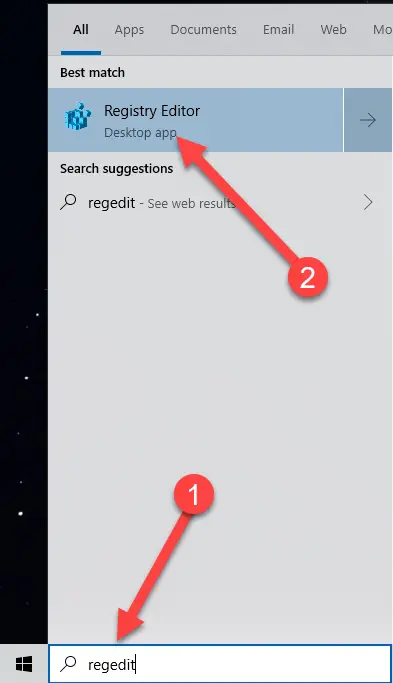
To begin, launch the Registry Editor by pressing the Start button and entering “regedit” into the search field. Click “Yes” to the UAC alert and double-click the “Registry Editor” shortcut that appears.
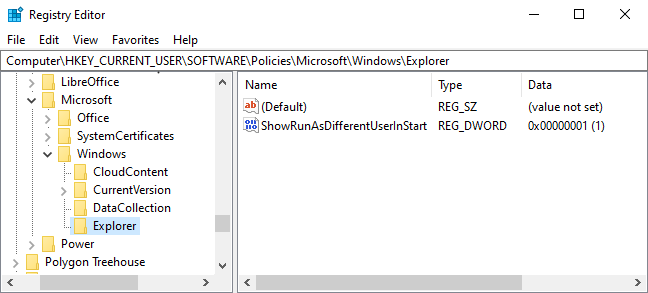
Using the left pane, go to the following key. You may also put the following URL into the address bar of the Registry Editor and hit Enter:
Computer\HKEY_CURRENT_USER\SOFTWARE\Policies\Microsoft\Windows\Explorer
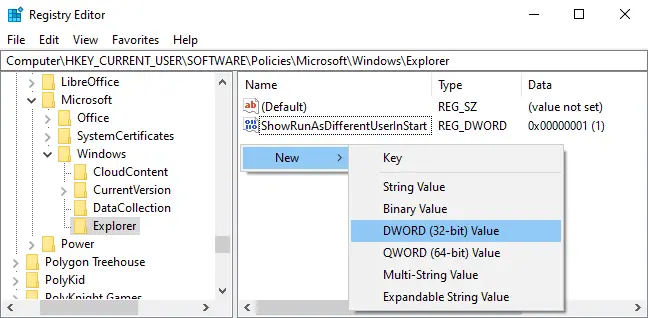
Create a new DWORD value by right-clicking in the right pane and selecting New > DWORD (32-bit) Value.
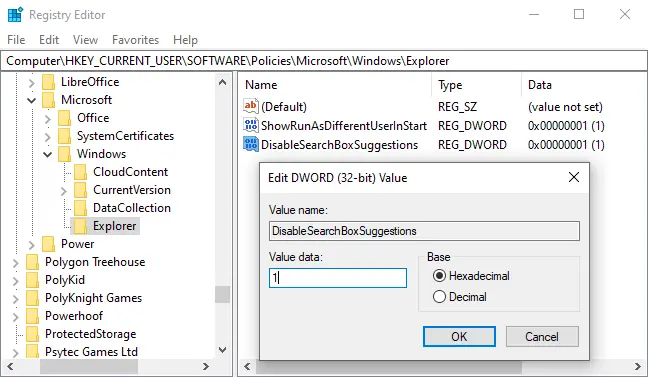
The value should be called “DisableSearchBoxSuggestions.” Double-click it and change the value data to “1.”
For your modification to take effect, you must restart your computer, log out and log back in, or at the very least restart Windows Explorer.
Download Our May 2020 Registry Change in One Click
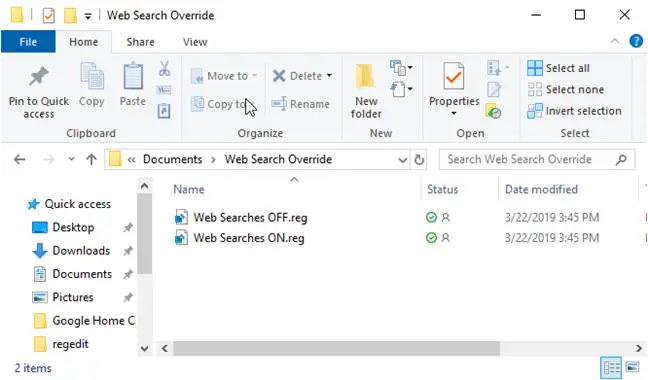
We’ve produced two downloadable files if you’re not comfortable making Registry changes yourself. One file blocks web searches from the Start Menu, while the other restores web searches. Both are available in the zip file below, and they both work by adjusting the variables we shown above. Double-click the desired one and follow the directions.
Disable Bing in Start Menu hacks may be downloaded here
The Old Way to Disable Bing Integration in the Start Menu
Please keep in mind that these instructions apply to previous versions of Windows 10, such as the November 2019 Update, the May 2019 Update, and the October 2018 Update.
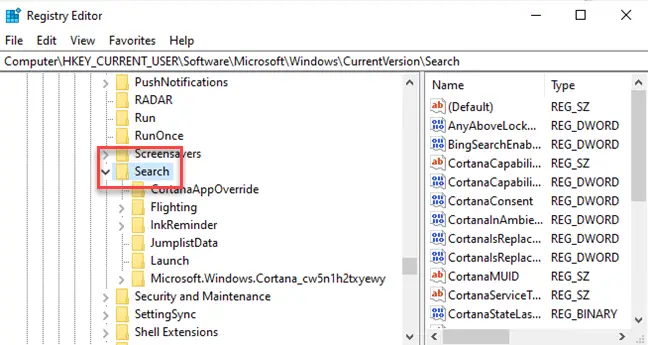
To begin, launch the Registry Editor by selecting Start, type “regedit,” and clicking Enter. Navigate to the following key in the Registry Editor using the left sidebar:
HKEY_CURRENT_USER\SOFTWARE\Microsoft\Windows\CurrentVersion\Search
Select New > DWORD (32-bit) Value from the context menu when you right-click the Search icon. BingSearchEnabled is the new value.
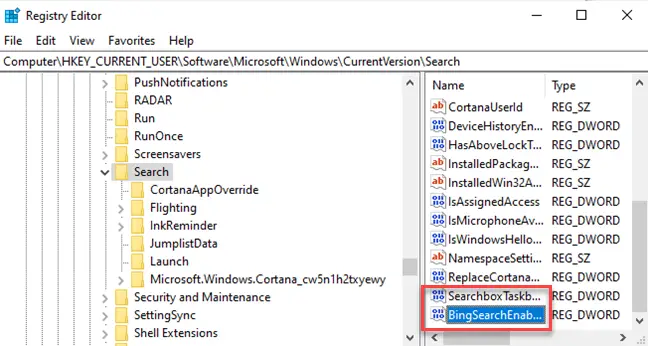
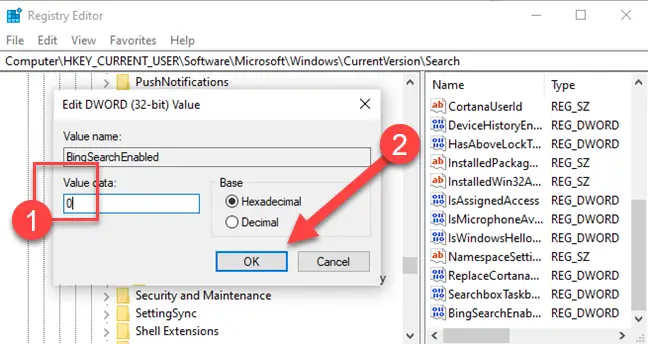
To access the properties dialog for the new BingSearchEnabled value, double-click it. The number in the “Value data” field should already be zero—just make sure it remains zero. To proceed, click OK.
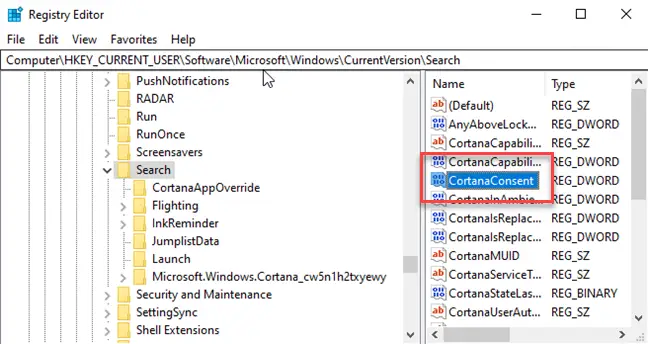
CortanaConsent should be underneath BingSearchEnabled. To access the properties dialog for this value, double-click it. Change the value in the “Value Data” box to “0.”
If you don’t see CortanaConsent, create it using the same methods as you did for BingSearchEnabled.
You may now exit the Registry Editor. Searching your start menu should now return only local results. If the modification does not take effect right away, restart your computer.

To restore web search results, just open the Registry Editor and reset the BingSearchEnabled and CortanaConsent settings to 1.
Instead, you may use this registry trick. If the change isn’t quick and you still see Bing results on your Start menu, restart your computer.
Get Web Search Override Files (older versions of Windows 10 only)
How to Disable Bing on the Start Menu the Old Fashioned Way
Update: Microsoft eliminated this simple graphical option from the Anniversary Update for Windows 10. Even if you deactivate Cortana through a registry or Group Policy setting, Windows 10 will not block online searches in the Start menu. If you like, you may change the Start menu to search Google rather than Bing.
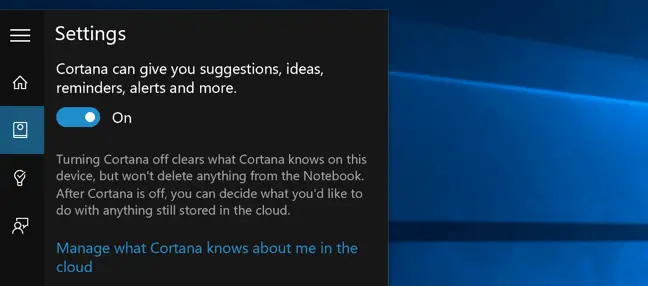
To deactivate Bing, just go to the Cortana search settings page – the quickest method to do this is to enter “cortana settings” into the Start Menu and choose the “Cortana & Search settings” entry.

This will open the options dialog, which will appear different depending on whether you’ve already deactivated Cortana.
If you wish to stop the Bing integration, you must also disable Cortana, so toggle that button to Off.
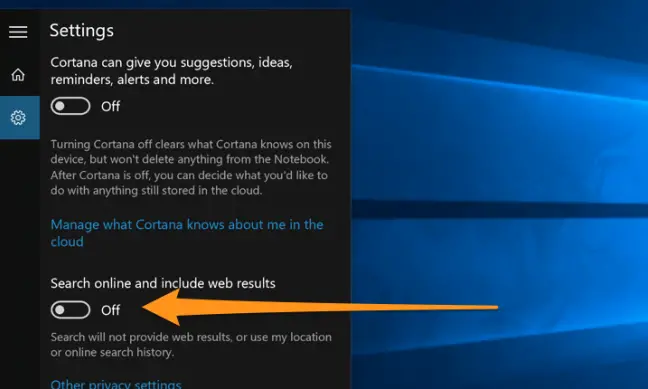
After you deactivate Cortana, the remainder of the dialog will change, and you’ll notice an option for “Search online and include web results,” which you should also uncheck – this is how you remove Bing from the Start Menu.
And now, when you search for anything, it will just search your own computer.
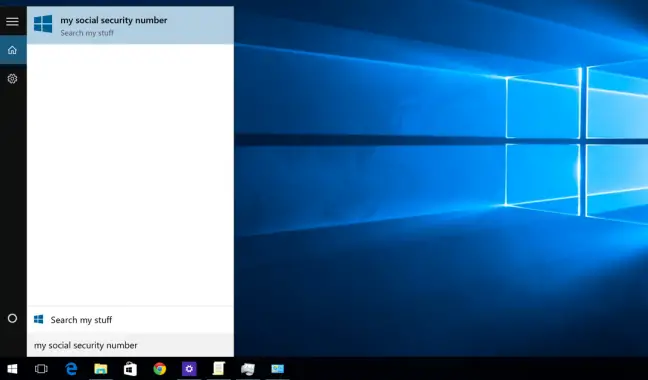
It’s much cleaner now, and it reads “Search my things” rather than “Search the web.”
It’s worth noting that if you wish to remove the Search box from the Taskbar, you must right-click it and choose the Hidden option.
