
Introduction
Although streaming is the most convenient method to view most movies, having a hard copy of your movies or home videos as a backup is a good idea. It’s simple — and free — to generate a backup copy of your movie library or just produce a playable DVD of your own films. Here’s how to burn films on a CD for playback on Windows and macOS.
What You’ll Require
On burn a video file to a DVD, you’ll only need a few pieces of software. Before we begin, please consider the following:
Unofficial or third-party downloads are much more likely to include potentially unwanted programs (PUPs) or malware than direct downloads from software providers. This tutorial’s programs are no exception. The official downloads for the applications in this guide are virus and PUP free as of August 2022, so make sure you download everything from the original source.
To begin, you’ll need the following items on burn your own films to DVD:
- A DVD burner drive: Most computers now come with some form of optical drive that can burn DVDs, but if you don’t already have one, you’ll need to get one. Internal DVD burner drives may be purchased for as cheap as $20, with external burners often costing around $5-10 extra.
- A blank DVD: Blank DVDs are quite inexpensive, and spindles are considerably less expensive per disc. There are two kinds of blank discs: DVD+R and DVD-R. These two formats are almost similar, and practically every drive sold today supports both, so it’s unlikely that it will make a difference which one you purchase. Whether you have an older DVD burner, however, check to see if it supports DVD+R or DVD-R. If it only supports one but not the other, purchase DVDs that work with your drive. If your movies are really large, you may also get twin layer CDs. Single-layer discs can hold 4.7GB of data, whereas dual-layer discs can hold 8.5GB. We favor single layer discs if possible, since two layer discs may sometimes cause issues during the burning process, but both should function. Before purchasing those discs, check sure your DVD player supports two layer burning.
- A video file (or several videos) to burn: Whether it’s your own home movies or a movie you pirated from your own collection, you’ll need a video file (or multiple films) to burn on your disc. The total size of all the videos you place on the CD cannot exceed 4.7GB (for single layer discs) or 8.5GB (for dual layer discs) (for dual layer discs).
- DVD Flick and ImgBurn (Windows): To burn discs on Windows, you’ll need two programs, both of which are free. DVD Flick transforms your films to the right format and makes playable menus before passing the converted video to ImgBurn to burn on disc (Warning: Before downloading ImgBurn, read the following few paragraphs for instructions). Before you begin, go ahead and download them.
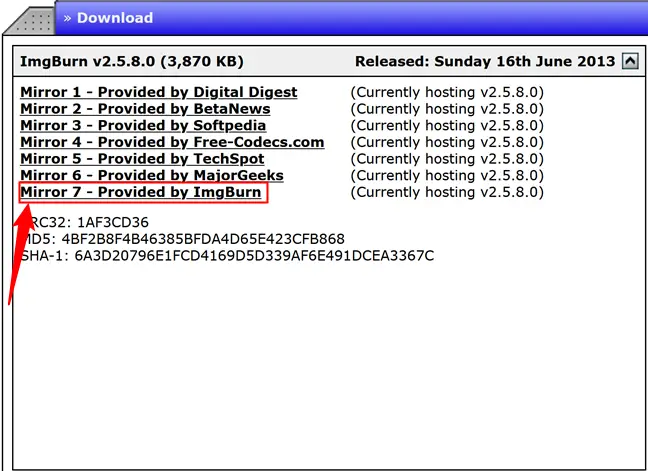
Warning: If you are not attentive, the ImgBurn download page has multiple links that can install PUPs on your system. The first mirror site, Digital Digest, for example, conceals the real download under a small text link but has several overt (and phony) download buttons immediately on the page. When you notice a lot of download buttons all over a website, you should be cautious.
We suggest using the ImgBurn mirror. At the time of writing, it is mirror seven, but that may change over time, so be sure the URL you use reads “Provided by ImgBurn.”
- Burn (macOS): Another free software for macOS that you can use to burn DVDs is Burn. This program can convert your films to the correct format, make a simple menu, and burn them on disc all in one convenient package. Scroll down to the Mac section for instructions on how to use the program once you’ve downloaded it.
Once you have everything you need, go to the phase where you will start burning your platform.
Windows: Use DVD Flick to Burn Video Files to DVD
On Windows, the easiest alternative we’ve discovered is a free program called DVD Flick. This tool can convert a large number of popular video files to a playable video format and provide a simple menu. You can even add numerous songs to a single disc and use your DVD remote to choose which one to play. It will then send the converted video to ImgBurn for disc burning. As long as both programs are installed, you may start in DVD Flick and ImgBurn will open automatically when required.
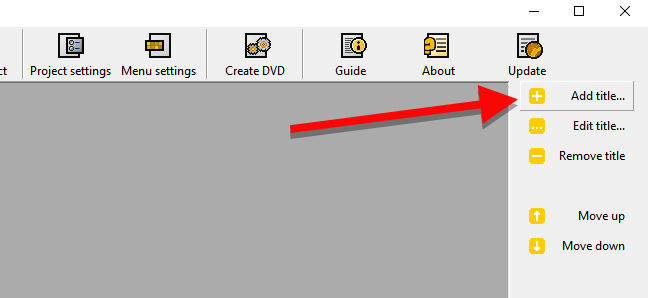
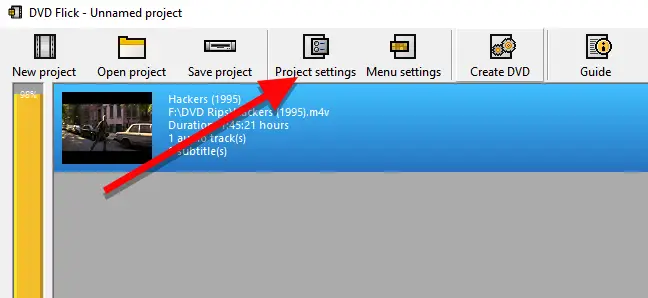
To begin, launch DVD Flick and choose “Add title.”
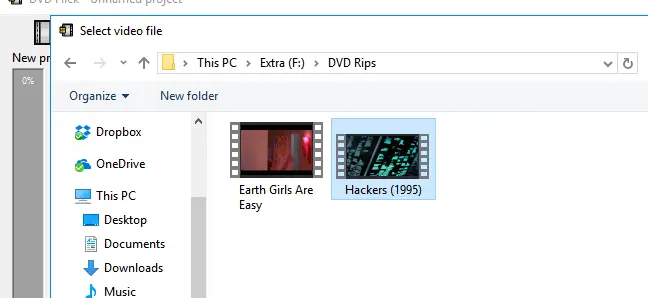
Select the video file to burn to a DVD. DVD Flick is compatible with a wide range of video and audio formats and containers. If you want to make sure your file is compatible, you can see the entire list here.
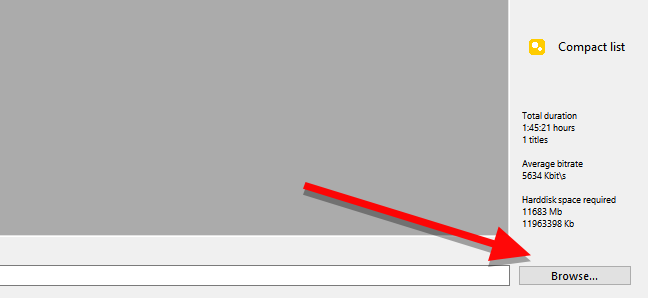
DVD Flick will need to convert your video to the VIDEO TS and AUDIO TS folder structure used by DVDs before it can burn it on disc. To save the converted files, you’ll need up on 8.5GB of hard drive space (depending on the size of the video file and the CDs you’re burning to). Click Browse in the bottom right corner of the window to choose a location to (temporary) store the converted video files.
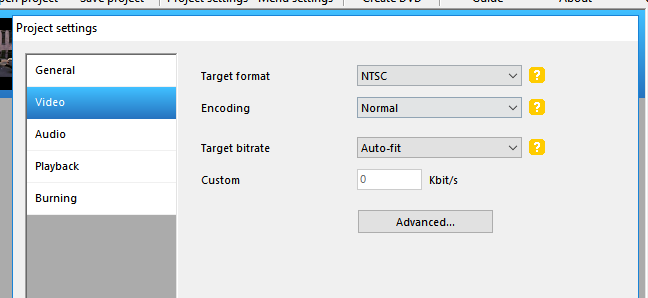
Then, select “Project Parameters” to change a few crucial video settings.
Give your disc a title in the General tab. Next, choose the size of the disc you want to burn from the drop down menu next to “Target size.”

Make sure that “Target format” is selected to NTSC (for playing on DVD players sold in North America) or PAL on the Video tab (for DVD players in Europe and Asia). If you wish to edit your video, you may also change the encoding or bitrate choices here, although most users won’t need to.
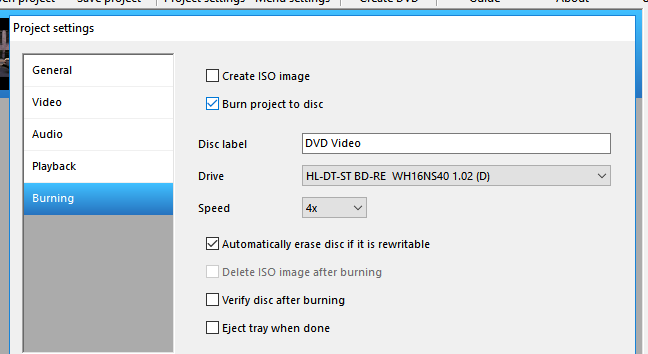
Finally, under the Burning tab, tick the “Burn project to disc” option. You may label your disc, which will appear when you enter it into a computer. You may also choose the pace at which your DVD will be burned. While you may choose a higher speed if your drive supports it, a speed of 4-6x is advised since it decreases the likelihood of encountering a major error and having to restart. Check “Verify disc after burning” if you wish to be extra cautious. This will perform a series of tests to ensure that your disc operates correctly when it has finished burning.
When you’ve finished, click Accept.
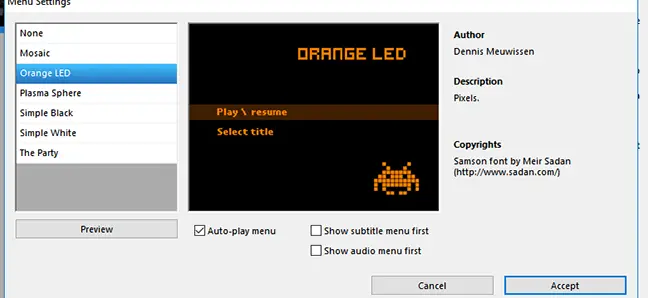
After that, you may customize the DVD menu that DVD Flick will create. While this isn’t technically essential, it’s a great step to personalize and give yourself a basic menu similar to the ones seen on store-bought DVDs. To make changes, go to Menu Settings.

You’ll see a tiny variety of DVD menus to pick from on this screen. They’re hardly the most elegant things in the world, but the default is no menu at all, which means the films on your disc will begin playing instantly. If you want to have the option of hitting play — or if you’re burning numerous video files on a single disc and want to choose which one to play — choose a menu style and click “Accept.”
When you’re finished, click Create DVD to begin the converting process. When the conversion is finished, a popup will appear informing you that the project will be burnt on a disc. Select “OK.” This will take some time, so take a break, but keep an eye on your computer since you’ll need to confirm a few boxes once ImgBurn begins.

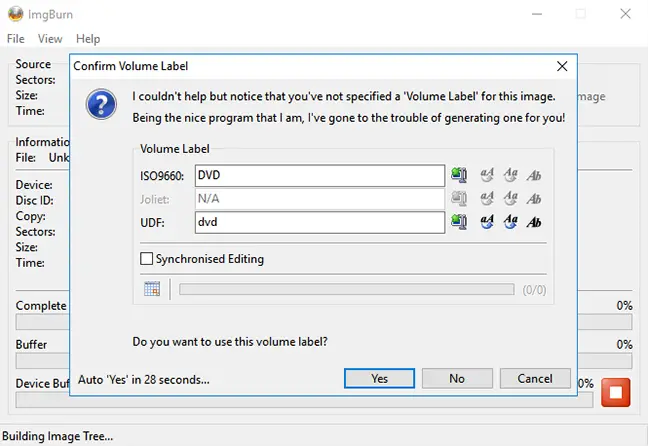
ImgBurn should launch immediately when DVD Flick has finished transcoding your movie and adding menus. It will prompt you to confirm a few selections. ImgBurn will first ask you to validate your DVD label. If you do not respond in 30 seconds, ImgBurn will use the default label.
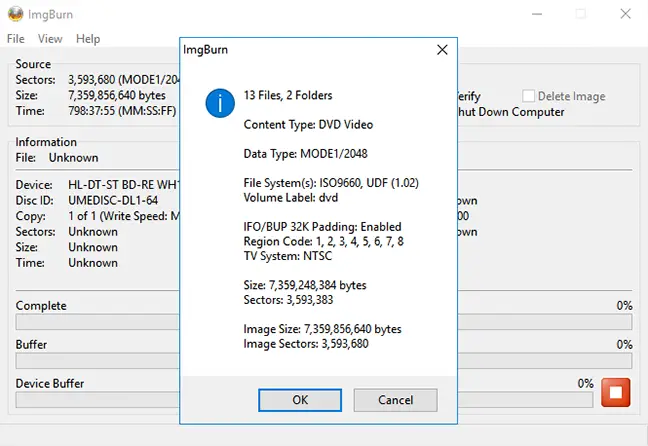
ImgBurn will then provide a summary of what will be burnt on the CD as well as a slew of technical data. It’s a bit bothersome since there’s nothing to decide here. ImgBurn does not utilize a timer for this, but you must still click OK to confirm. Just make sure you’re close to your computer when this small box appears to begin the burning process.
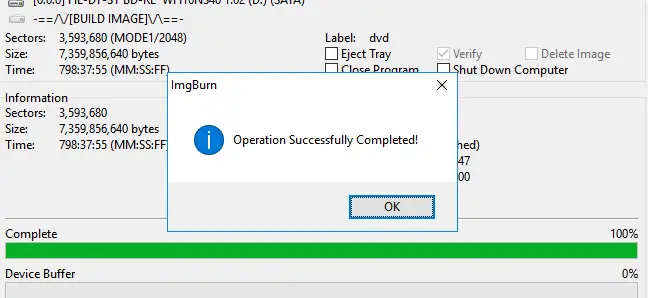
ImgBurn will take a few moments to finish your movie before displaying a box that says “Operation Completed Successfully!” When finished, your DVD drive may also remove the disc, so make sure it’s free of any obstacles.
Insert your disc into any DVD player and the menu you selected should appear on the screen. To begin watching your video, click “Play/Resume.”
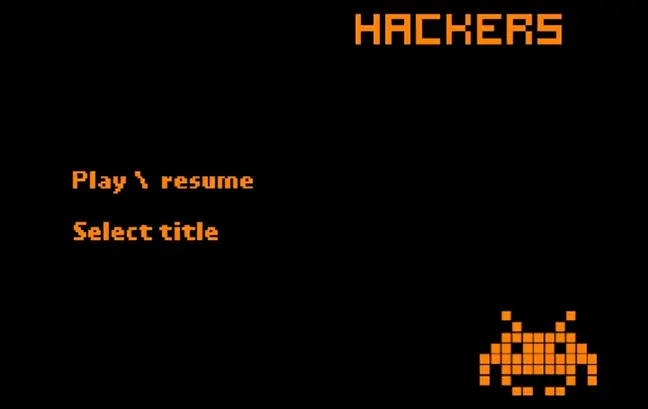
DVD Flick generates a simple menu, but your film should play on any NTSC-compatible (or PAL-compatible, if you choose) DVD player.
Burn Video Files to DVD on Mac using Burn
Burning a video DVD on a Mac is a bit easier than on Windows. You just need one application, aptly titled Burn, which you can get here.
Once installed, launch the app and choose the Video option at the top.
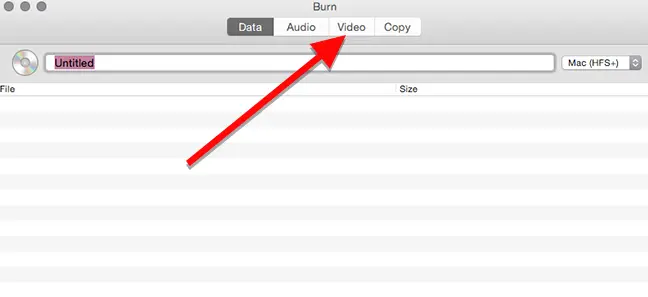
Give your disc a name at the top of the window and choose “DVD-Video” from the drop down option on the right.

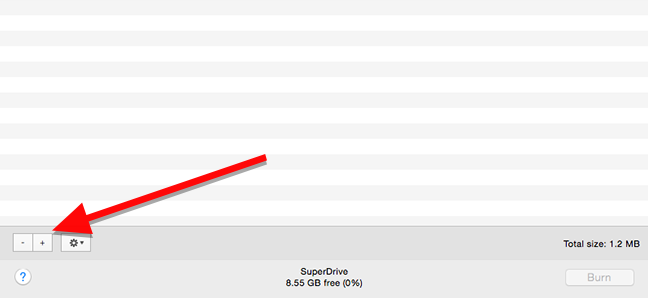
To add a video file to your project, click the + button at the bottom of the window.
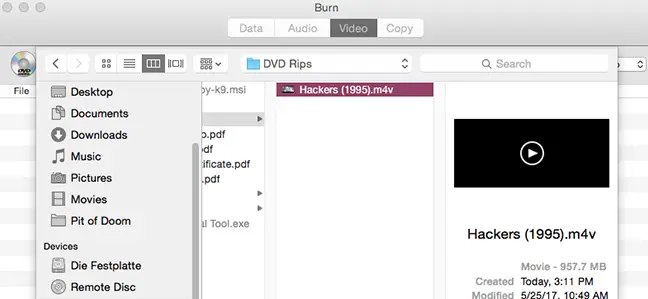
Choose the movie you wish to burn and click Open in the window that appears. Burn is based on various open source conversion tools, including ffmpeg, lame, and spumux, and should support the majority of popular video formats.
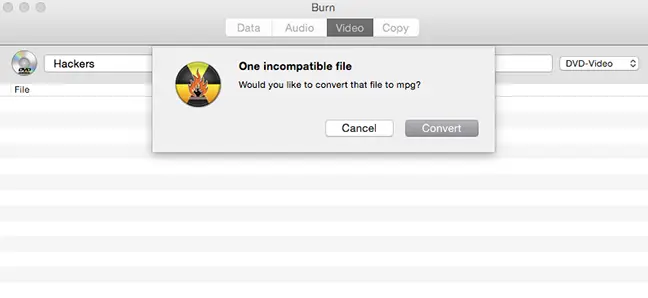
DVDs must technically be in the VIDEO TS and AUDIO TS folder formats. Because your videos are unlikely to be in this format already, Burn will offer to convert them for you. To begin this procedure, click Convert. You’ll be prompted to choose a location on your hard disk to (temporarily) store the video files. Make sure you have enough space on your computer and save it somewhere you can find it later.
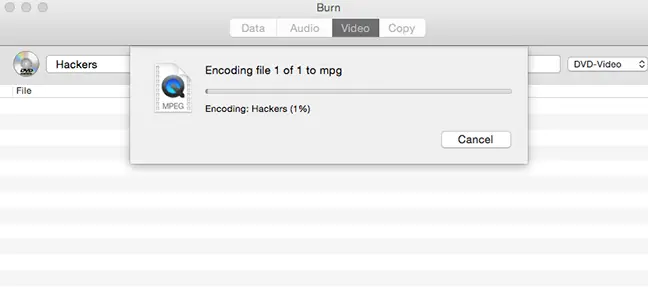
While converting, Burn will display a progress meter. Grab a food since this may take some time. After that, you may burn your video to a CD.
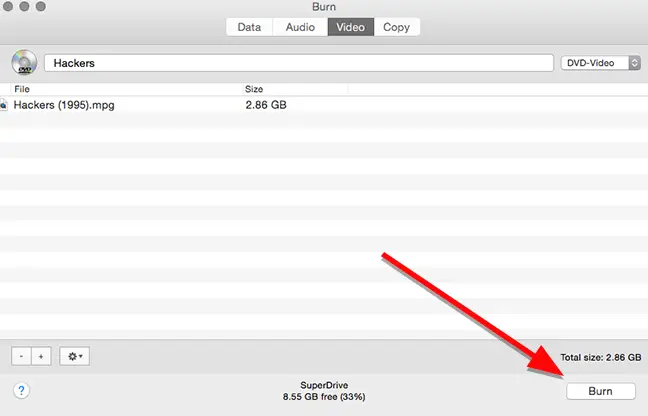
When the conversion is complete, your movie will appear in the list of files to be burnt. You can also see how large the file is here, which can help you choose what sort of disc you need. Remember that single layer DVDs have a maximum capacity of 4.7GB, whilst two layer DVDs have a maximum capacity of 8.5GB. When you’re ready, insert a blank disc into the drive and press the Burn button.
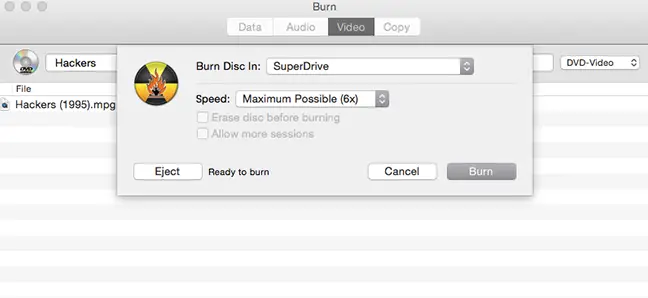
You may choose the disc drive to burn to and the speed at which you wish to burn it in the window that displays. While you may change the pace, it’s usually better to go with the default settings. You may be able to burn it quicker if your drive can take it, but this increases your chances of a catastrophic failure, requiring you to redo the whole burning process. To be safe, leave the default settings alone and click Burn.
When the burn is complete, insert the disc into any DVD player to see a much simplified menu. To see the movie, click on the track you wish to watch.
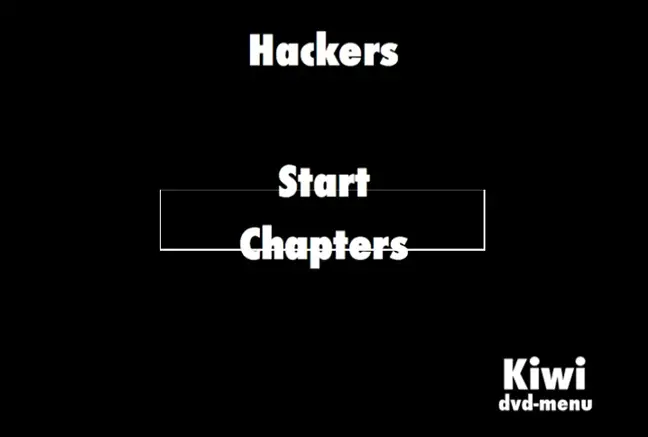
The menu, as you can see, isn’t ideal. The highlights above the buttons didn’t line up correctly each times we tried it, but it’s simple enough to figure out how to press Start to start the movie. Otherwise, the film functions similarly to any other DVD purchased from a retailer.